Sourdough Artisan Loaf - Beginner Friendly!
This beginner-friendly sourdough recipe uses a simple mix-it-all-at-once method—no autolyse or advanced steps—while still delivering a crusty, flavorful artisan loaf. With step-by-step instructions and photos (including shaping for both boule and batard), this guide will help you build confidence and bake the chewy, soft-crumb sourdough you’ve been dreaming of.
Equipment
- Food scale
- Mixing bowl / Proofing container
- Dough whisk or sturdy mixing spoon
- Bowl scraper
- Bench scraper
- Parchment paper
- Baking vessel Dutch oven, bread pan or covered roaster
- Bowl cover or plastic wrap
- Banneton basket or bowl/cheesecloth for proofing
- Bread lame or sharp knife
- Food thermometer
- Rice flour optional
- Water mister
Ingredients
Starter (Same day dough mixing):
- 40g Sourdough starter or discard
- 40g All-purpose or bread flour
- 40g Warm water
Starter (next day dough mixing):
- 10g Sourdough starter or discard
- 50g All-purpose or bread flour
- 50g Water
Dough:
- 500g Bread flour
- 340g Water
- 100g Sourdough starter at peak
- 10g Salt
Instructions
Dough:
- Add the water and starter to a large mixing bowl and mix well.
- Add flour and salt; mix until no dry bits remain. Use a bowl scraper and scrape down the sides of the bowl so everything is fully incorporated. Cover the bowl with bowl cover or plastic wrap and let the dough rest for 20 minutes.
- Perform 4-5 sets of folds at 20-30 minute intervals. To do a stretch and fold, gently stretch one side of the dough upward and fold it over itself, then rotate the bowl and repeat on all 4 sides. After the final fold, cover the dough with plastic wrap and place it somewhere warm to finish bulk fermentation. This can take 5-9 hours, depending on kitchen temperature. Warmer kitchens ferment faster.
- Once the dough has doubled in size, looks jiggly, and has visible bubbles on the surface, it’s time to shape. Use your bowl scraper to loosen the dough from the sides of the bowl and gently turn it out onto your counter.
- Pre-shape: Wet your hands to prevent sticking and use a bench scraper to tuck the edges underneath. Let the dough rest on the counter for 15–20 minutes to relax the gluten before final shaping.
- Final Shaping: Lightly flour the top of the dough, then flip it over so the smooth side is down. Fold the bottom up, then the sides in, and gently seal the middle. From here, follow the steps for shaping either a boule (round) or batard (oval).
Batard (oval loaf) shaping:
- Fold the top down to the center and press gently. Cross the upper corners over each other, then roll the dough up from bottom to top until it feels smooth and tight. Pinch the sides to tidy up the shape. Dust your banneton with rice flour (or regular flour if you don’t have any), place the loaf in seam-side up, cover, and refrigerate for the cold proof.
Boule (round loaf) shaping:
- Fold the top down to the center and press gently, then flip the dough seam-side down with your bench scraper. Use a few gentle push-pull motions on the counter to build tension and round the shape. Stop once the dough feels smooth and tight. Dust your banneton with rice flour (or regular flour if you don’t have any), place the loaf in seam-side up, cover, and refrigerate for the cold proof.
Cold proofing:
- Once shaped and in the fridge, your dough begins cold proofing. This step isn’t required, but it improves flavor, texture, and makes the dough easier to handle and score. Most bakers cold-proof for 8–24 hours. If you skip it, let the dough rest at room temp for 1–3 hours, though it may be softer and harder to score.
Baking:
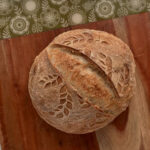
- Preheat your oven to 475°F (235°C) with your baking vessel inside for 30 minutes. When ready to bake, place a piece of parchment on the counter and gently flip your dough out of the proofing container, seam-side down. Dust off any excess flour, lightly mist the top with water (just a little), and sprinkle with fresh flour. Grab your lame or a sharp blade and score your design, something simple like a wheat stalk is great for beginners. Make clean, quick cuts about 1/4 inch deep, then finish with one deeper expansion score along the loaf to help it rise in the oven. Have fun and get creative, there’s no wrong way to score!
- After scoring, carefully remove your preheated baking vessel from the oven. Use the parchment paper to lower your dough into the pot. Reduce the oven to 450°F (210°C), cover, and bake for 25 minutes. Then uncover and bake for another 10–15 minutes, until the crust is golden and crisp. The loaf is done when it reaches an internal temperature of 205–215°F (96–102°C). Remove and cool on a wire rack before slicing.